Lee
Senior Member
Posts: 1,899 
|
Post by Lee on Jun 10, 2006 22:51:18 GMT 1
This is a show and tell about how we do our castings so that others can see that it just isn't that hard to do. It will be done in a series of postings. In looking back at old pictures, I can see changes we have made in how we do things and thought it was time to share. There is no one "right" way when doing castings. But there are some easier ways. ;D
|
|
Lee
Senior Member
Posts: 1,899
|
Post by Lee on Jun 10, 2006 23:09:45 GMT 1
It all started with the cutting board in Jerry's kitchen. Here is where those one of a kind masters are made. Hence the name - Cutter. In the picture you are seeing some of our first attempts at casting by ourselves. 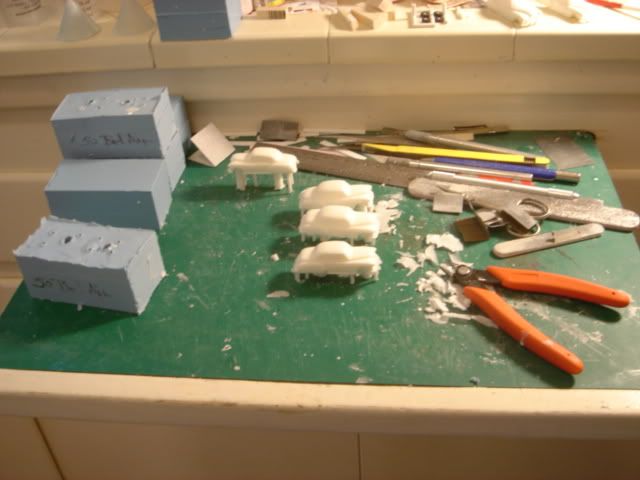 First, the most important pieces of equipment are the vacuum pump and vacuum pot. The vacuum pump I got on eBay at a good price because the seller misspelled vacuum. The vacuum pot is nothing more than a 5 gallon pressure paint pot bought at Harbor Freight. The compressor that you see in the first picture is not used at all anymore. 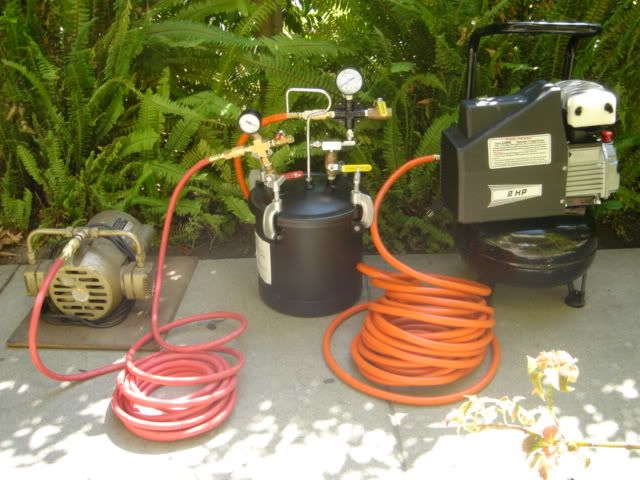 Here is a close up of the pipping into the vacuum/pressure pot. Note the vacuum gauge on the left reads 25 pounds or -25 pounds. We are able to get the vacuum down to -27 pounds in this rig. The pressure gauge on the right is not used anymore. 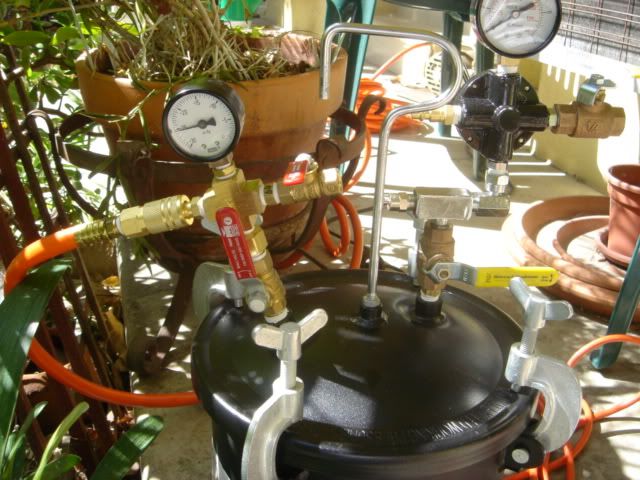 and a peak under the lid of the pot. The tees are to keep the air from blowing the liquid rubber out of the molds. 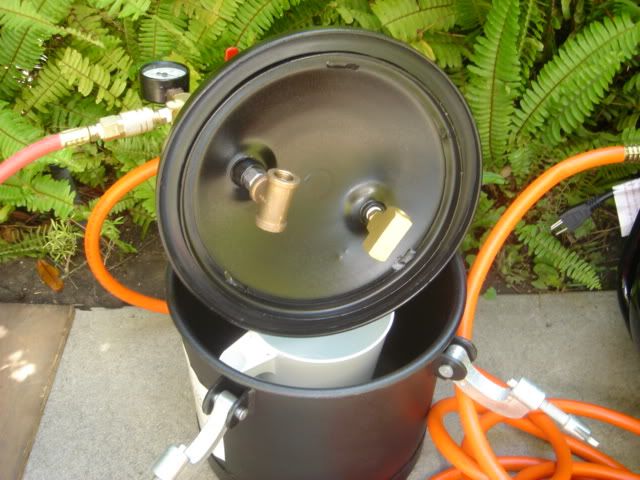 |
|
|
|
Post by Sylvain on Jun 10, 2006 23:14:32 GMT 1
Very interesting thread! Good idea Lee!
|
|
Lee
Senior Member
Posts: 1,899
|
Post by Lee on Jun 10, 2006 23:37:45 GMT 1
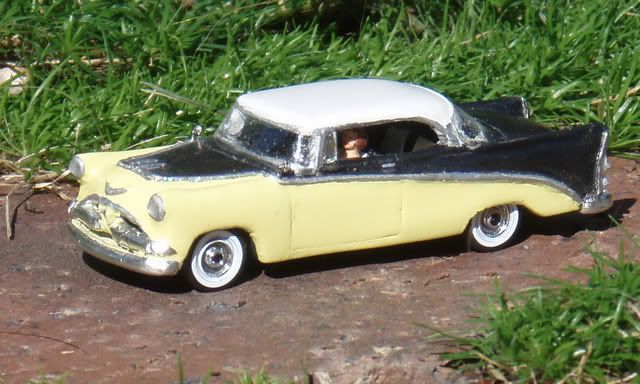
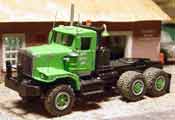
Now we move to the "molding room" ;D Here are the masters that Jerry has made for us to make molds of: 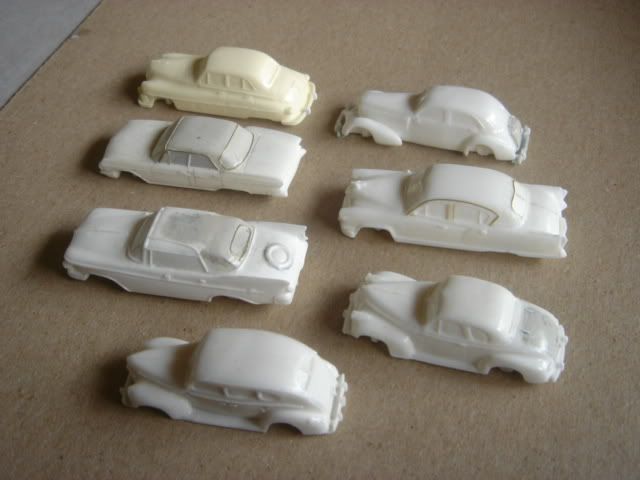 Each wheel well is packed with clay as seen in the front of the next photo. Then the master is mounted on a clay base as seen in the back of the next photo. The clay is easier to work with if warmed first, such as putting it out in the sun for a while. Make sure that there are no air pockets. (Jerry found out about this the hard way! ;D) 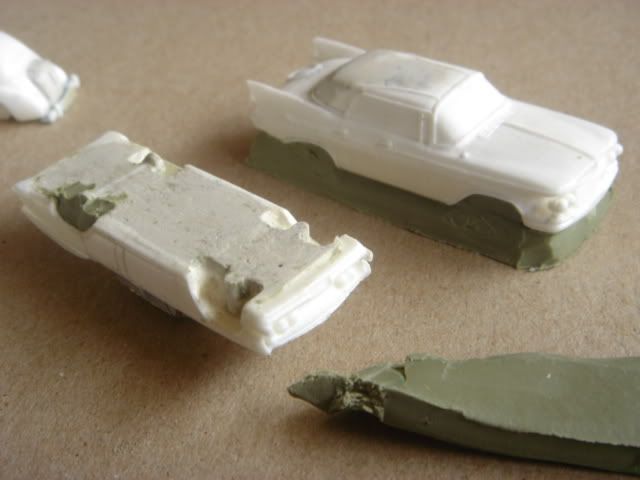 We make our molding boxes out of foam board. It has a smooth surface, easy to cut and is fairly cheap. Leave at least a 1/4 inch space between the master and the side of the box on all sides. there should be around 1/2 inch from the top of the master, including the clay base, to the top of the box. 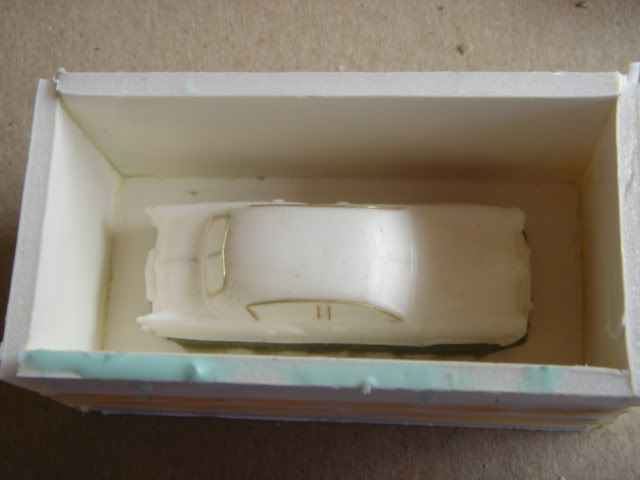 Double check your master for anything that should not be there - fingerprints, dust, bits of clay, etc. What is in the box is going to be in the mold. Jerry has found that clear coating the master makes them smoother, but be very, very careful of "paint" buildup around the trim. For vehicles with bumpers that extend out beyond the vehicle the the 30's, we glue a very thin piece of paper or plastic under the whole piece. This lets the two parts of the mold separate easy without breaking off the bumper. It also adds a little strength to the piece while handling it. |
|
Lee
Senior Member
Posts: 1,899
|
Post by Lee on Jun 11, 2006 0:18:24 GMT 1
Now we are ready to mix the rubber. The rubber we use is a 10-1 mix by weight.  Jerry bought an electronic scale for mixing the rubber. How much rubber to mix is an educated guess. We keep an "extra project" mold on standby incase we make to much rubber. We have a pie tin in the bottem of the vacuum pot incase the rubber overflows during the vacuum process. Yes, the rubber has overflowed on us but the pie tin save the day. Mix the rubber in a container that has 3 times the volumn of the rubber itself. Mix the two parts together well. Place the mixing container inside the vacuum pot and start the pump. Watch the vacuum gauge. As the vacuum increases, the lid will be drawn down and the roosters can be tightened again. We get down to -27 pounds and let the pump run for 15 minutes. This is called deairing the rubber. Deairing makes for a much smoother, creamier rubber, which makes for a much better mold. Once the 15 minutes has gone by, shut off the pump and release the vacuum in the pot. Pour the liquid rubber into the molds. Leave about 1/8 th inch at the top for the second pour. After pouring the rubber into the molds, put the molds into the vacuum pot. Take the vacuum down to -22 -23 pounds. ( Warning - Do NOT go any lower with the vacuum) (see new post at end of this thread explaining why) This draws any trapped air out from around the wheelwells, etc. It take only a couple of seconds to do this. The next picture is the molds after the first pouring of the rubber. Notice that some boxes are smaller and full. I will explain later.  Here is a tire mold, which only a one part mold.  Now the rubber has to set for 24 hours. We normally let it set for 2 days before we move on the the next part. Very carefully take the mold box apart. Try not to break the seal between the master and the mold. Remove the clay base and the clay in the wheelwells. Then put the mold back in the mold box. It should look like this: 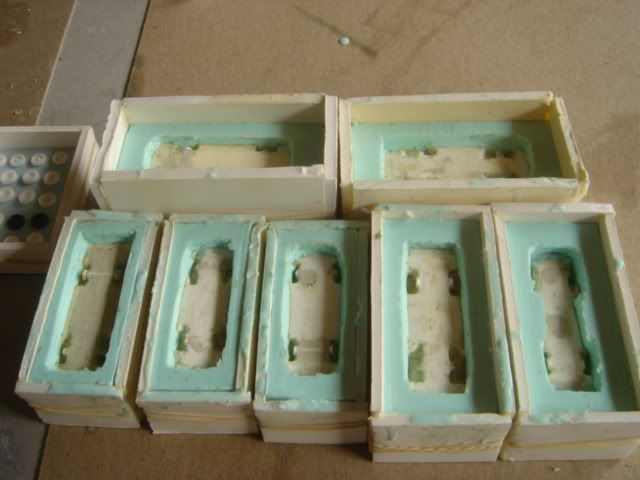 Now we spray the molds with a mold release!! If you forget to do this, the next pour will stick to the first pour and you have a mess. Now we mix up enough rubber to fill the mold boxes to the top. Same process as the first time. When the boxes are filled with the second pour, pull the air out with the vacuum at -22 -23 pounds. Let set for 24 hours. Jerry usually drops them off to me the next day and I get to play. ;D |
|
Lee
Senior Member
Posts: 1,899
|
Post by Lee on Jun 11, 2006 1:00:04 GMT 1
Now we move to the demolding and casting room. ;D It is here that we get to see the results of all the efforts. In the first picture some of the molds are still in their mold boxes, some have been removed and the two have separated showing the master inside one and removed from the other: 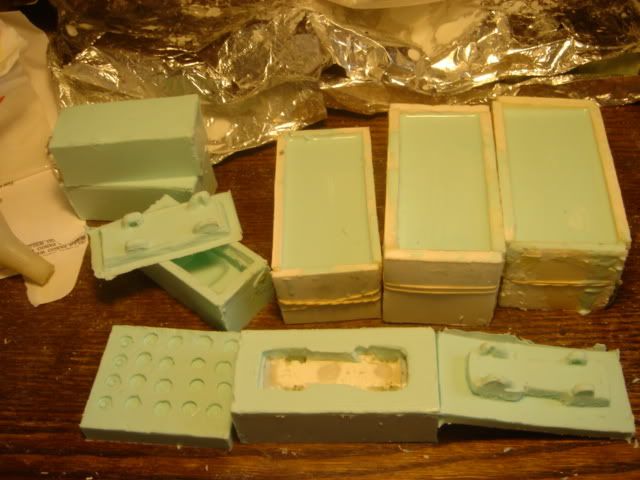 Notice that now we don't set up for air vents when making the molds. I found that by sharpening the end of a piece of 1/8 inch tubing, I can punch holes in the top half of the mold. The picture shows the top of the top of one mold and the bottom of the top of another mold with the punch in one of the holes. There is the piece that was removed from the hole in front of the top: 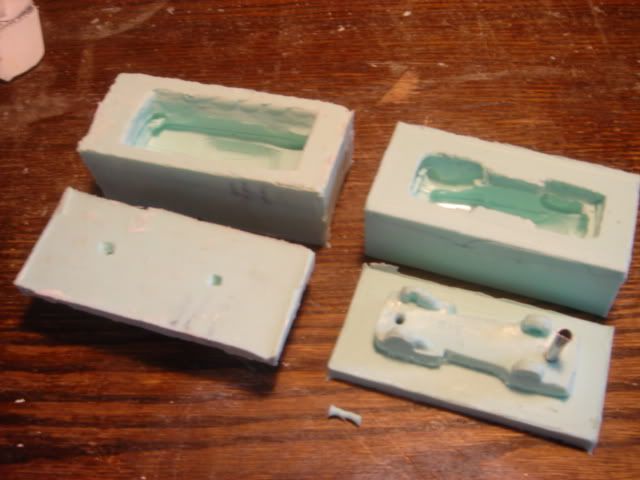 With the two half's of the mold together, mark with a line showing how they fit. This helps when casting. Now is the time to put on latex gloves or you will be sorry!  Next the molds are powdered with a powder that we got from the same company that we buy the resin from. The powder gets rid of the "static cling". The air wants to stick to the mold when the resin is poured into the mold. The powder gives nothing for the air to hold on to. This eliminates the need to pressure the castings as we did at Stoney Mountain. The top of the mold is waiting at the top of the picture for it's turn to be powdered. 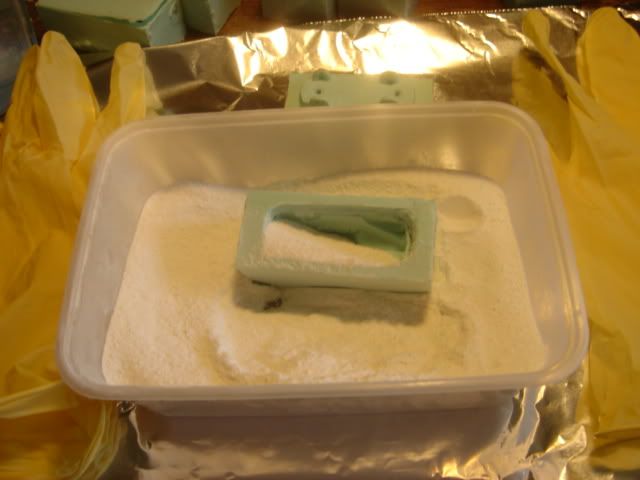 Here is the resin and mixing gear. We buy the resin in larger quanities and pour it into the bottle you see as needed. The clear plastic measuring cups come marked in various incrument measures. One for each of the two part resin. Do not mix up the cups!! I have to mark the cups with a magic marker so I can see the lines when I am pouring the resin. The mixing cups are small Dixie cups bought by the 200 pack for less than $5.00. The mixing stick is a small, wooden coffee stur stick. Tin foil is placed on the work surface because the resin is going to get all over the place. The "used" powder is at the right to be mixed into the resin. A "marked" mold waits behind the mold we are going to pour. 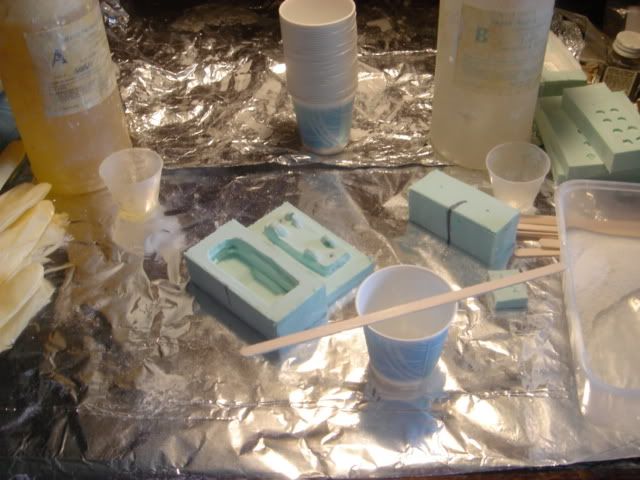 The resin is mixed 50-50 by weight. I guess by height in the measuring cups. About 1/4 teasthingy of the powder is being added to the mixing cup before pouring the resin in. The powder makes the resin much stronger. After the power is in the mixing cup, part B of the resin is added and mixed with the powder. Then part A of the resin and the whole thing is mixed. The resin set time starts when you add part A so move along. No time to stop for pictures now. Pour the resin into the mold filling to the top of the vehicle. Take the mixing stick and rub around inside the mold knocking loose any trapped air. Don't forget the bumbers and headlights. Place the lid on top of the the mold. Pick the mold up and turn it from side to side letting the air excape in the air vents. Place the mold down and let the resin set for at least a 1/2 hour. Here we have finished pouring the molds. Notice that the molds on the right are curing as they were first poured while the molds on the left still have clear resin as they were last poured. Tire molds in the background. Oops molds at the extreme right. : 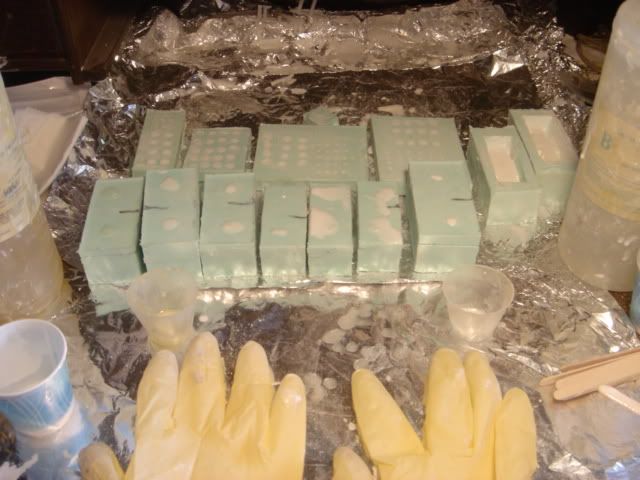 You can take the gloves off now. Notice the resin on the gloves and tin foil. I use the gloves two or three times before they are shot. |
|
Lee
Senior Member
Posts: 1,899
|
Post by Lee on Jun 11, 2006 1:57:53 GMT 1
Now to see the results.  After the resin is set the top of the mold is removed revealing the bottom of the casting. Using the nippers seen on the right, the two air vent plugs are cut off. If there are holes in the bottom of the casting - stop and set the mold aside. 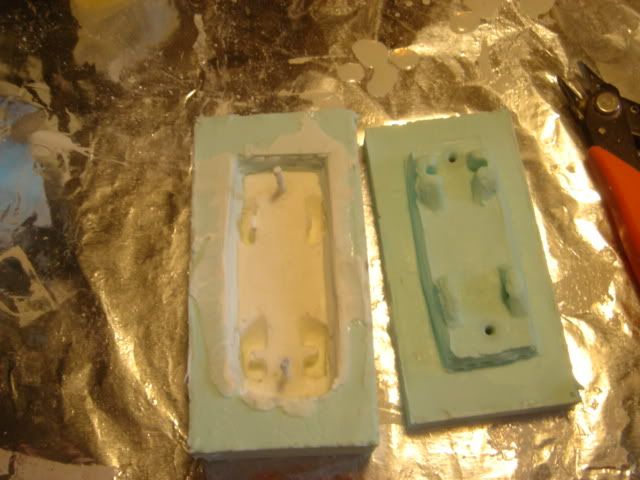 The rubber is very flexible. Push out on the sides breaking off the side resin flashing. Then do the ends. Again push out on the sides of the molds and work one end of the casting out of the mold, then the other end. Clean off any extra flashing and WALLAH!! We have a duplicate in very little time compared to what it took to make the master. 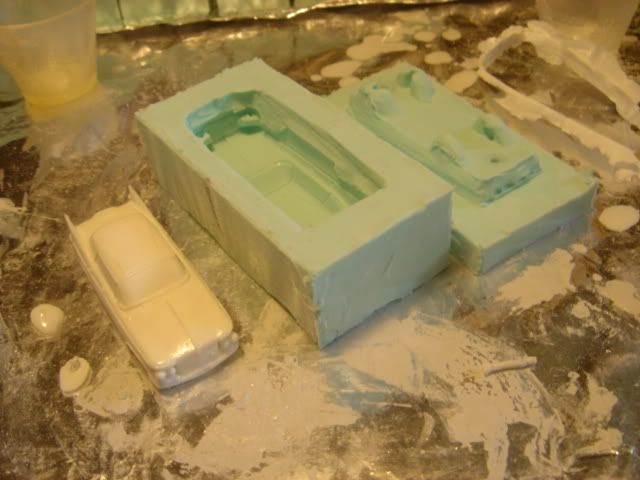 Those molds with the holes in the bottom of the castings can be filled at the next pouring. The picture shows two molds with castings that have holes in them on the right. The two castings on the left had holes which have been filled. Remember the two OOPs molds? Those are the castings. It is better to have some thickness to the top of the mold. Remember the small molds we made? The tops were too flexible and I think some of the resin squeezed out when handling them leaving holds in the bottom of the castings. 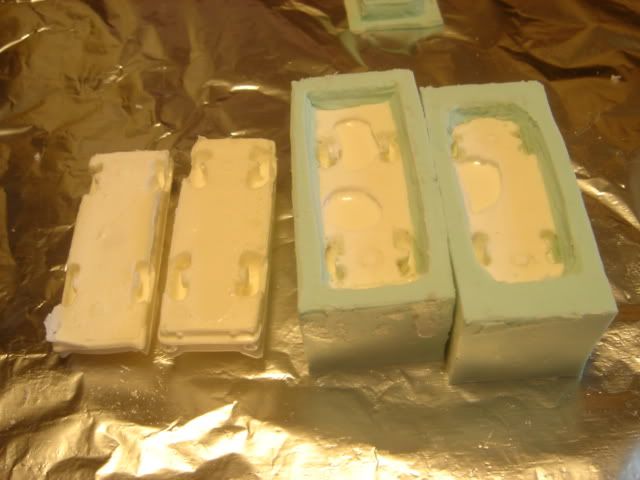 Other than matching the tires and packaging thats all that there is to it. All the casting of all the models that Jerry and I do in the rest of our lifetime won't even begin to equal the number of one run of one model that the big boys do. ;D I most happy to answer any questions that anyone has. Lee |
|
|
|
Post by swampdaddy on Jun 11, 2006 4:32:18 GMT 1
Hi Lee: Impressive tutorial and it sure looks complicated or at least time consuming. My hat's off to all of you who pursue the lesser known models using the process. I copied this into a folder though I am not sure I'll ever attempt it.
Any chance of a PDF file of this tutorial? there are free and paid programs that will convert regular ".doc" and other formats into PDF.
And, by the way, I like those ferns, when are we gonna see those in HO? LOL
Swamp Daddy
|
|
Lee
Senior Member
Posts: 1,899
|
Post by Lee on Jun 11, 2006 4:42:34 GMT 1
Hi Lee: Impressive tutorial and it sure looks complicated or at least time consuming. |
|
|
|
Post by DavidJohnson on Jun 11, 2006 5:46:01 GMT 1
Lee,
Thankyou for the tutorial. Personally it is highly interesting as my next project will include casting.
Dave
|
|
|
|
Post by cfesmire on Jun 11, 2006 5:58:11 GMT 1
Wow! great tutorial. Thanks Lee, one knows just what they're getting into after reading it.
|
|
|
|
Post by nickvoges on Jun 12, 2006 16:40:21 GMT 1
Thanks, Lee, for this interesting article. Would like to see them under "How to do" on the first page, so it won´t be lost....
But one Question? How often you can use a mold in average?
Best regards nick ingmar
|
|
Lee
Senior Member
Posts: 1,899
|
Post by Lee on Jun 14, 2006 3:11:29 GMT 1
Nick, The nice part of being able to make molds is that you can make more than one mold of the same vehicle. At SMCC we had up to eight molds of one vehicle going at any given time. But then we were pouring like twelve molds on a single pouring. I only mix and pour one at a time.
How long a mold lasts depends on a number of factors. The average is around 40-50 moldings before the mold starts to go. Molds like convertables will be the first to go because you have to pull on the rubber to get it out of the middle. When the resin starts sticking to the mold, sooner or later you are going to pull a piece of the mold out when you take out the resin vehicle. Some of you may notice little pieces of green rubber in places like headlights or deep crevises. Those are little pieces of the mold sticking to the casting.
To answer swampdaddy's comment about it taking time. Jerry spends at least a week's worth of time making a master. The time spent in making a mold and casting a vehicle is less than a half day total. That is counting working time and not time needed to allow the rubber or resin to cure.
I can cast a vehicle in less than five minutes. Allowing an hour for the resin to harden before demolding, I can have a vehicle ready to be worked on in little over an hour.
The really neat part of the whole thing is that you can share your work with others. Look at the number of pieces in Sylvain's collection that Jerry has been able to share with him from both SMCC and CMC. I see a number of people doing some very interesting, one of a kind, projects that could be molded and cast.
The only thing that I don't know how to mold is Chester's weathering! ;D I sure wish I knew how to copy it for everyone.
|
|
|
|
Post by nickvoges on Jun 14, 2006 19:01:54 GMT 1
Thanks Lee,
thats why I asking. Would like to share some of my models as well, but I do it in another way, and normally my molds die after three or four castings. And I like to form the models, not the molds. Still try other possibilities and made some good progress. If its not working I´ll try your way, now where I got such good explanation. Another member of this board make it similar your way and gave me good ideas yet.
Best regards nick ingmar
|
|
Lee
Senior Member
Posts: 1,899
|
Post by Lee on Jun 16, 2006 4:58:46 GMT 1
Jerry wanted me to talk some more about the vacuum and what happens. Air pressure around us is somewhere between 27 to 32 pounds per square inch (PSI). This means that the air around us is "compressed". When a gas, which air is, is compressed, the amount in a given space gets smaller in size. A cubic yard of air can be compressed down to a cubic inch, but it will be at a much higher PSI. What the vacuuming does is make the little, tiny pockets of air trapped in a liquid grow in size. When the air bubble gets big enough, surface tension or "static cling" is not strong enough to hold the air bubble in place and it floats to the surface. Much like a carbonated beverage after you open it. When vacuuming the rubber, we drop the vacuum as far as it will go which is around -27 PSI. This causes the rubber to "boil" or foam as the air is expanding and rising to the surface. The rubber needs to be vacuumed in a container at least three times the size of the rubber itself. Fifteen minutes of this and the rubber is smooth as silk. Now after pouring the rubber into the molds, we put the molds into the vacuum chamber and drop the pressure again. But this time we only go do to around -22 to -23 PSI. Why? That is about the point that the rubber begins to "boil" All you want to do is draw any trapped air out of the model such as the wheel wells, etc. Dropping the air below this point will cause the rubber to "boil" right out of the mold. Ah, thats why we have a pie tin in the bottom of the vacuum chamber. To keep the mess at a minimum. And yes, we have had messes.  Any air trapped inside the model will be pulled out at this time. Jerry found this out the hard way. He didn't fill a piece all the way with clay, leaving an air pocket inside. When we did the second vacuuming, the air forced its way out ruining the clay piece that he had made. Toss that mold. ;D |
|

 Jerry bought an electronic scale for mixing the rubber. How much rubber to mix is an educated guess. We keep an "extra project" mold on standby incase we make to much rubber.