|
|
Post by Sylvain on Apr 29, 2004 22:43:25 GMT 1
Yes, really nice job! And all that using one of these awfull Jouef models as a start? Great!  |
|
skunk
87thScale addict
5th B-day
Posts: 2,762
|
Post by skunk on May 3, 2004 0:05:26 GMT 1
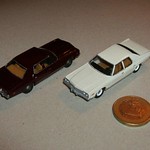
Considering the amount of work this model required, the Renault 30 could almost be considered a scratch-build.
Did all 30's have double headlights, or just the TX?
|
|
|
|
Post by only87 on May 3, 2004 2:39:35 GMT 1
The R30 had the dual lights and the "smaller" R20 had single ones. That was the optical main difference between those two types. This may be the main reason for the non-satisfying upper class car sales from Renault at that time. In real life I would prefer the 20, but I think the dual headlights look better in 87th scale. About casting... jes, I think I will try again. Hoping for better efforts with other materials and a bit colder blood for a less hastier hand. I'm always too excited what will come out and the material I was using last time took a whole day to dry... not a good combination...  |
|
skunk
87thScale addict
5th B-day
Posts: 2,762
|
Post by skunk on Aug 26, 2004 5:31:59 GMT 1
Just wanted to congratulate on the marvelous work by only87 on his Fiat/Seat Ritmo (see website listed on his entry above).
Question: How did you make the rims? Just paint, or was there some sculpting involved?
|
|
|
|
Post by only87 on Aug 26, 2004 23:40:29 GMT 1
Thank you very much, the rims and the bottomplate are leftover from another Ibertren Ritmo not shown, which was was of one my first attempts in detailling cars. I'm not that sure anymore if the wheels are from Roco or Brekina, but they were the old standard VW rims as used on the Beetle and the Bus or Transporter. The hupcaps are sanded plain and the crimps (?) are scratched in with a knife. However, I wasn't too content with it, so I tried to correct it a little with thick white paint.
I have this Revell color (N° 04) Which thickens very fast once you have opened the can. After some sessions it can't be used any more as paint, so I took it as a kind of putty.
Shake the closed can, open it and let the paint leftover on the cap dry for about 5 minutes. You can paint structures with it now. Now let the paint dry on the model or rim or whatever and correct the shape from time to time (Next 30 to 45 minutes, I usually take a sharp knife for that), because the paint still flows a bit. You can even work out the structure up to perfection while that time.
Very fine details can be done that way. Take a look at the little green Econoline van on my site. The decorative strip on the side of the van is made that way... and the complete front, which looks a bit zombie-like on the picture. It's much nicer, with readable Ford lettering and such.
Give it a try! It takes a little time, doing it that way, but it's surely worth the effort.
|
|
skunk
87thScale addict
5th B-day
Posts: 2,762
|
Post by skunk on Aug 27, 2004 20:14:45 GMT 1
I have used paint as a kind of filler before (Tamiya matte black worked for me) but never for sculpting to such a degree. Will have to try.
Maybe we should repost the previous entry in the workbench section...?
|
|