skunk
87thScale addict
5th B-day
Posts: 2,762
|
Post by skunk on Jan 14, 2007 1:02:11 GMT 1
When I pour a mold or casting, I place it on top of my de-humidifier to get the air bubbles out. The vibration of the machine brings the bubbles to the top. I let it sit there until it has cured. I also use a talcum powder bag to eliminate the static electricity inside the mold before pouring the resin. How very esoteric... I don't have a de-humidifier, but maybe I should get one. Vibrations and dryness sound like a good combo, and NY could certainly use some de-humidifying! Also, what kinds of casting problems does static electricity cause? A talcum powder bag is hardly a serious investment, but where does one get one? CVS? |
|
skunk
87thScale addict
5th B-day
Posts: 2,762
|
Post by skunk on Jan 14, 2007 1:42:19 GMT 1
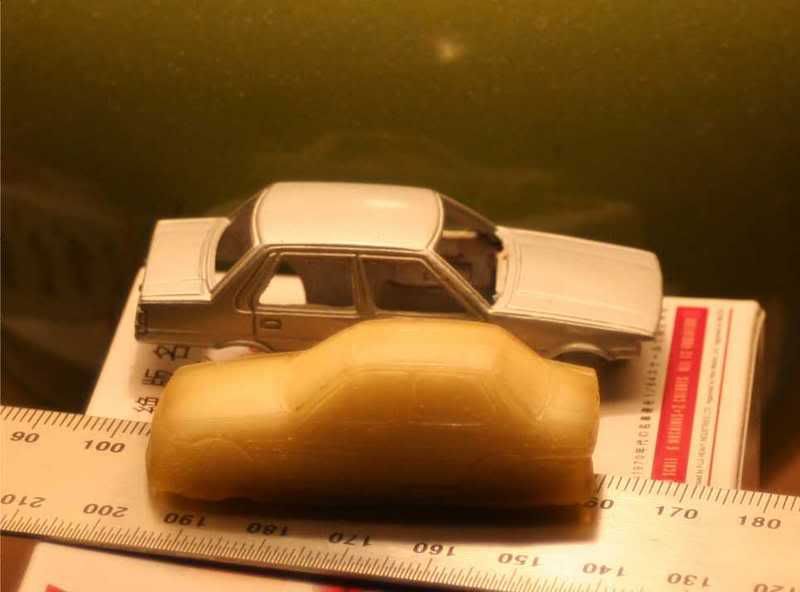 So maybe I am being redundant, but I promise that this is the last picture of the shrinking in progress... I excuse myself by including a pic of the original. In this shot you can also see just how football shaped the car still is. Sadly, lots of very small bubbles have begun appearing in and underneath the surface. More work for later. |
|
|
|
Post by superba on Jan 14, 2007 15:02:37 GMT 1
The only air bubbles to worry about are those on the surface when casting. I have found that when not using the exact 4 to1 ratio of water to Hydroshrink, air bubble will be seen in the actual casting, but they should not pose a problem.
When using the correct ratio, no bubble appear and the resulting casting cures to a orange translucent color.
Yesterday I actually cut open a shrinking casting, the texture inside was like a sponge with air bubbles. The casting did shrink to the correct size without distortions.
Your casting is doing fine.
|
|
skunk
87thScale addict
5th B-day
Posts: 2,762
|
Post by skunk on Jan 16, 2007 9:00:49 GMT 1
Yes. I think it is alright, although I think the surface teared a tiny bit and some bubbles developed, but nothing that won't fix easily.
And it is currently quite transparent, full of bubbles inside - but they are not moving, so who cares?
Sadly, the casting is now near it's correct size, but it still looks pregnant (chubby in the middle) and still appears to be shrinking a bit too quickly for my liking. Oh well. At least, I am glad that someone is reading about my travails.
|
|
|
|
Post by superba on Jan 16, 2007 16:07:22 GMT 1
Skunk...don't lose hope. I have air dried all my castings. Some of them get to just the right size, but are still bowed at the roof or the sides, after several more days of drying they do flatten out without material shrinking.
|
|
skunk
87thScale addict
5th B-day
Posts: 2,762
|
Post by skunk on Jan 17, 2007 1:26:37 GMT 1
Yes, you are right. It only shrunk another 0.5 mm today (in ten hours), and the chubbiness is slowly subsiding. Also, I unwittingly seem to have picked the exact proportion - I was aiming for 45.3mm and it is currently at 45.5mm. Can't complain about that, can I?
|
|
skunk
87thScale addict
5th B-day
Posts: 2,762
|
Post by skunk on Jan 19, 2007 3:07:24 GMT 1
It was to good to be true. The model retains somewhat of the shape of an American football, and has shrunk to about 1/92.  But, I already cast two more of the same car, in slightly different proportions. And I have more stuff in the works. And since I am taking notes, I should be able to offer fairly exact calculations after another four or five cars. This time I also cast the cars with a small hollow in the body, which should make the process quicker and minimize warping in the earlier steps, allowing me to make a mold before the shrinking process is entirely finished. This without any of the problems inherent with a true hollowcast (bubbles, permanent warping). |
|
|
|
Post by Sabuu on Jan 19, 2007 10:52:17 GMT 1
It sounds to be quite some work to make a car this way, but it would definitely be worth while if turns out OK!! Looking forward to see the final results!
|
|
skunk
87thScale addict
5th B-day
Posts: 2,762
|
Post by skunk on Jan 19, 2007 20:00:33 GMT 1
No matter what, it is still less work than sculpting one from scratch, which was my other option. Plus, it isn't exactly work: I spend five minutes making a mold, five minutes making a cast. It is six hours for the mold to set and about a week for the casting to cure, but it doesn't mean I have to do anything. We'll see how I feel once I am all done.
|
|
|
|
Post by only87 on Jan 19, 2007 20:24:04 GMT 1
When I used the Hydroshrink I stopped making solid casts in the end and preferred hollow casts. This was mainly because of the air bubbles, they were less when I made the hollow castings.
But it may depend on how you work, on the materials you use, the ratio, temperature, etc, pp. Maybe even your water quality.
I think it is best to find out for yourself what works best.
What I see and hear (well, actually only see) in this thread from you looks and sounds very promising. One thing I have learned when working with the Hydroshrink is patience. You'll get the results you want, but it won't be tomorrow.
Try making a good casting of the Miber BX in the meantime, I want one, hehe.
|
|
skunk
87thScale addict
5th B-day
Posts: 2,762
|
Post by skunk on Jan 20, 2007 1:05:18 GMT 1
Well, I just cast a Citroen BX, we'll see how it turns out - it's my first hollowcast! I am only doing the basic body, no bumpers, chassis, interior or glass. If things are good I'll send you a few, as part return for the dozens you've given me.
I also made some new molds of 1/64 cars, a Konami Civic '83 and a '78 Starlet. When I cast them in Hydroshrink, I will hollow them out quite a bit, but not entirely.
How many hollowcasts have you made? Are you letting things pile up in order to blow our minds later?
|
|
|
|
Post by only87 on Jan 20, 2007 12:43:47 GMT 1
How many hollowcasts have you made? Are you letting things pile up in order to blow our minds later? Yes and no. I made about 11 different castings from the Hydroshrink period, mainly models smaller than 1/64. I was happy with my results then, until I found the napthta method. The Hydroshrink models needed a lot of rework like puttying, bending, sanding, etc. I really don't have that kind of time at the moment. Also some of those models apeearead from Furuta and the naptha method is just better for models smaller than 1/58. So the Hydroshrink models are totally on ice at the moment. Last week I redid the Tomytec Hiace, though. The naptha casting is just so much better, no bending, no puttying and only minor sanding needed. I won't redo some other models like the Toyota Sport 800, the Furuta model will be very close to 1/87, there just is no room for a resin model. I have a little more time at the moment, and I will concentrate on working on a few models, hopefully completing them in the next two months. Some of these will blow your mind indeed. |
|
|
|
Post by superba on Jan 20, 2007 17:23:48 GMT 1
Ok....What's naptha casting?
I agree with skunk the actual effort is minimal, I just hate hollowing out the solid castings. Saving that task and detailing for last.
Skunk, your project looks great? Don't feel bad over shrinking. I still have about five projects that have not shrunk enough so I will recast this weekend using more water.
|
|
|
|
Post by only87 on Jan 20, 2007 19:47:42 GMT 1
Napthta casting is normal RTV casting but with one difference. You mix the RTV with napthta (crude oil, commercially available as Zippo lighter fluid).
It has the same effect as Hydroshrink. The napthta diffuses from the mix, the RTV shrinks, evenly. The big difference is that you shrink the mold.
The advantage compared to Hydroshrink is obvious. The shrinking process takes part while making the mold, a fully usable RTV mold.
All you need are some extra cents for the napthta. The rest is casual mold making.
The disadvantage is the shrinking ratio, 1/72 scale models are about maximum. If you go for two casting/shrinking runs, shrinking from up to 1/58 scale models is possible.
I prefer that method for 1/64 or slightly bigger models. After the first shrinking run the model turns out at ca. 1/80. Most diecast models need some detail work, mostly the wheel arches are too big or there's just a lack of detail. It's easier to modify the model at the 1/80 scale than at 1/87. The I do the second run.
Models in 1/72 or smaller need only one casting run, no more as casting a 1/87 model in the first place.
If you wanna try it out, it's best to begin with a 1/72 model. Use 1 part RTV and 1 part napthta. It may depend on the RTV you use, but all the silicone I used so far came down to quite exact 1/87.
And .... the process can be reversed! Make a normal RTV mold and bath the mold in naptha. The mold will expand. Make a casting with the fully expanded mold and if the model got too big ... do a shrinking run.
1/112 models will "grow" to 1/87 scale, if I remember correctly.
Expanding models is a bit more complicated compared to shrinking, because you have to find a way to get the napthta off the mold surface before casting without letting the mold "shrink back" I bath the mold while casting but do not let the naptha float inside. Still, most castings need minor rework resulting from "napthta damage".
|
|
skunk
87thScale addict
5th B-day
Posts: 2,762
|
Post by skunk on Jan 21, 2007 5:15:38 GMT 1
I have an image of a mad professor making RTV grow and shrink... one more thing Peter told me is that one has to make sure to use a silicone that sets in max two hours, otherwise the naphta sinks and the mold is warped.
I am currently using six-hour silicone, I want to use all of that up and I also want to use all of the hydroshrink I got, since I know that it doesn't last very long once opened.
I have done some detail work (rims, dashboard) in hydroshrink with excellent results. Should be a great way to get whichever rims I want, in any size (13 inch? 16 inch? no problem!) I could desire. Now I just need to figure out a source for rubber tires in all of these sizes.
|
|