SMCC only made one piece molds. We never had the time nor the knowledge to go beyond that point
We would make a solid master and mount it on a wood block that was smaller than the base of the master. Then we would mount the block on a wood base making sure that we had at least a 1/4 inch all around the master. Then we made the four sides of the mold, again making sure that they were at least 1/4 inch taller than the master. The wood we used was a special 1/2 inch plywood that had a smooth, formica like, finish. We used a cauling gun to "glue" everything together.
We would make a couple of dozen molds that way because we mixing the rubber for the molds took time and it was just as easy to do a bunch as one. I do not remember the names of the rubber or resin we used because Hal always order it and I did not pay much attention. We would mix maybe a half gallon of rubber and run it thru the vacuum chamber that we had. After about five minutes of vacuum the rubber was very, very smooth - like liquid silk. We filled all the molds and set them aside for 24 hours to cure.
Once the rubber had set we would take the molding boxes apart using a putty knife. The caulking would hold everything together, but with a little prying we could get the caulking bond to let go. Then we would pop out the master from the new mold and put it back in storage.
The next step was the actual mixing and pouring of the resin. We used a type of resin that was 50% part A and 50% part B and had about a 15 minute set up time. Everything was mixed in 2 quart Pyrex glass mixing bowls making it easier to clean up afterwards.
10 to 15 molds were set up side by side. We would try to have more molds ready than the resin we mixed so we wouldn't waste any. The part A resin would be poured in one mixing bowl by eye "to the line". Part B was poured into the second bowl again by eye trying to match the same amount as part A. Then part B was poured into part A which started the clock on the setting time. A few quick stirs with a paddle then the molds were filled trying to come up just a little into the area created by the block.
We had made a couple of metal disks about 10" in diameter with a wood dowel handle standing up in the middle. These would fit into both the vacuum chamber and the pressure pot. The molds with the resin would be stacked on one of these disks around the handle. They had to be stacked like bricks so air could get to the resin.
Our vacuum chamber was a piece of steel pipe about a foot in diameter and a foot tall with one end welded to a piece of 1/2" steel plate. There was a hole in the side of the pipe with a piece of 3/8 inch pipe welded in it. The top of our big pipe had been ground flat. We had a rubber ring we laid on the top of the pipe and then put on a piece of 2" thick clear plastic as a lid. Very much homemade, but it worked.
The disk with the filled molds would be lowered into the vacuum chamber and the lid put on. The vacuum pump started and as we watched the guage drop to about 22 lbs vacuum the resin would start to bubble like it was boiling. This pulled out all the little air bubbles. After about 15 seconds the pump was shut off and the chamber filled with air. You had to open the valve slowly or the rush of air would blow the resin out of the molds.
Next is the pressure pot, another homemade item. We took a five gallon spray paint pot and cut of the tube inside. One port was for the compressor hookup and the other port was used for a pressure guage.
Once the vacuum chamber pressure was back to normal and the lid could be removed, we transferred the disk with the molds to the pressure pot. The lid had like six clamps that had to be dogged down to seal the lid. The pressure would be raised to about 60 lbs to pack the resin tight into the molds. It molds would be left in the pressure pot until the resin set. The main resin we used was a transparent amber in liquid form when mixed, but turned to an off white when set. You could tell when it was starting to set up because you could see cloudy white streaks forming.
Remember the clock started running as soon as you mixed the resin. I got caught running out of time more than once. Those you never saw. ;D It seems that heat has a direct effect on the curing time of the resin. When we were in Nevada, I had to pour in the early morning hours when it was cooler. (high 80's)
Now everyone wants to argue the pros and cons of vacuum and preasure. All I can say is that we developed the system we used over a period of time trying to find a better product. The vacuum made all the little tiny air bubbles expand and rise to the surface, much like you see in a soda when you open it. The pressure would pack the resin tight in all the little nooks and cranies, making for sharp, clear cut lines. You can tell the difference in our product that was made over a period of time. The ones we did later are much better than our first.
Some of the customers wanted the vehicles in clear so we found a clear resin that was clear. Again I do not know the name of the product but, as I remember, it was mixed by weight.

not volumn.
After the casting were popped out of the molds the base would be sanded off on a belt sander. (If anyone got a vehicle where I went a little be to far, I'm sorry). The white resin was easy to sand but the clear would heat up and get soft making the truck bumpers almost impossible to sand straight.
I tried filling the bottem of the mold (top of the cab) with clear resin. The next day or later I would finish filling the mold with white resin (body and fenders). The two resins worked well together giving clear windows and sandable bumpers. There was only a couple of dozen of these made and sold to individuals.
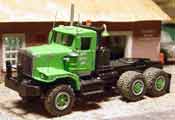
Our generic, one size fits all, tires were made with a gang mold. Twentyfour tires glued flat to a piece of wood in four rows and molded. They were a bear to pour as you had to make sure you filled each hole of the mold. We used a large putty knife to remove the excess resin from the top of the mold before it set up. The only tire made for a vehicle was the ones for the Studebaker pickup. They had spoked wheels.
We could get around fifty castings out of a mold before it started breaking down. As soon as we got a bad casting from a mold, the mold was tossed. We had as many as eight to ten molds for a single vehicle.
Some of the things we learned about masters:
Handle as little as possible. Finger prints do show.
If there is a flaw in the master, it will be in ALL the castings. Fix the flaw before you make a mold. You will be sorry if you don't
When you are done making a master and have cleaned it up, give it a coat of shellac ;D or varnish. It gives a much smoother finished casting.
 not volumn.


 We are trying to figure out how to seperate the tire from the rim so we could do it.