jim68cuda
Junior Member
It takes a Mopar to Catch a Mopar
Posts: 224
|
Post by jim68cuda on Mar 13, 2008 4:01:32 GMT 1
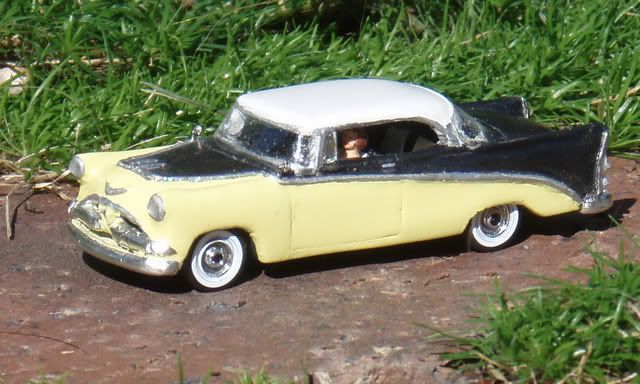
![]() ![]() By jim68cuda[/img]  By jim68cuda By jim68cuda![]() [/img] Well, heres my first attempt at posting photos. I've been busy so, I haven't hardly touched my HO train layout in several years. I went up to the attic to take a couple photos and realized the summer heat and winter cold has not been kind to the layout. It needs alot of work. Track and Walthers street system roadways have buckeled in places. layers of dust will be difficult to remove from scenery, and an alarming percentage of the population of the largest town on the layout have dropped dead in the street and left to rot. If the photos worked, there should be two different views of the same intersection at the edge of the layout. The Busch black Mustang convertible has been given red line tires by using a red Sharpie marker on the white walls. A red self adhesive tape stripe was added to the lower body side to give it the look of a Mustang GT. The Wiking Chevy Malibu has the interior, windshield, and convertible boot from a Busch Mustang, The Tyco Camaro also has the Busch Mustang windshield interior and convertible boot, as well as the Busch Mustang's entire chassis. The Williams Brothers 64 GTO has Busch wheels (again with the red line tires made by a Sharpie marker over whitewalls). The 40 Ford coupe has the chassis, fenders hood, grille and bumpers from a Jordan kit, and the coupe body from a Tyco/IHC Used car lot HO scale building kit. The body of the crude coupe from the structure kit is pretty soft plastic and was easilly trimed to fit the Jordan parts with an exacto knife (an easy conversion I did years ago). |
|
jim68cuda
Junior Member
It takes a Mopar to Catch a Mopar
Posts: 224
|
Post by jim68cuda on Mar 13, 2008 4:41:44 GMT 1
 It looks like I could get thumbnails to post, but nothing larger. Clicking on the thumbnails appears to take you to Imageshack, but not to the photos. Clicking on Jim68cuda below the photos takes you to a collection I have on Imageshack of two 1/18 scale dioramas I built with the help of a couple friends. Mixed in at the beginning of the 1/18 scale photos, are two copyies of each of the photos above. One of each is the same size as the thumbnails above. The other two can be clicked on to see the full size image. I guess you'll have to really want to see the photos pretty bad to go to the trouble of clicking on Jim68 cuda under the photo above, and then click on the photos on Imageshack till you find the two that will enlarge. Is it always this difficult to post photos? |
|
jim68cuda
Junior Member
It takes a Mopar to Catch a Mopar
Posts: 224
|
Post by jim68cuda on Mar 13, 2008 5:52:29 GMT 1
Did it work? did the bigger picture post like it appears it did on the preview?  |
|
|
|
Post by hofan on Mar 13, 2008 11:25:55 GMT 1
Hello:
Yes it did and looks very nice.
regards
|
|
|
|
Post by Sylvain on Mar 13, 2008 13:34:10 GMT 1
Nice pictures! I like a lot your Malibu and Camaro convertibles. For my part, I've always thought of converting a Malibu into a convertible, but never did.
|
|
|
|
Post by DavidJohnson on Mar 13, 2008 17:21:57 GMT 1
Jim, Your photos look good.  I especially like the Camero convertible, 40 Ford coupe, and the GTO. Nice work on the conversions. One thing I have always wondered about is a good source of passengers for convertibles. Suggestions? Dave |
|
jim68cuda
Junior Member
It takes a Mopar to Catch a Mopar
Posts: 224
|
Post by jim68cuda on Mar 14, 2008 6:02:50 GMT 1
 [ftp]http://img259.imageshack.us/img259/5194/hoforddealersh5.jpg[/ftp] Just one block down Main Street from the intersection in the photos above, Main Street makes a sharp turn to the right, and Station Street meets Main at the curve forming a triangle and forming one of the most highly visible corners in town. While the surrounding buildings have remained unchanged through the decades, this corner has seen several different buildings, In the 20's and 30's this corner was home to a Ford dealership... |
|
jim68cuda
Junior Member
It takes a Mopar to Catch a Mopar
Posts: 224
|
Post by jim68cuda on Mar 14, 2008 6:06:42 GMT 1
 In the 40's and very early 50's, the corner was home to a Gulf station... |
|
jim68cuda
Junior Member
It takes a Mopar to Catch a Mopar
Posts: 224
|
Post by jim68cuda on Mar 14, 2008 6:12:56 GMT 1
  But for a short time, from the mid 50's till the early 60's, the corner was home to Arnolds Drive-in. Even today people still remember days spent cruisin' Arnolds and the car hops and rock and roll music that would always be playing on the juke box inside. |
|
jim68cuda
Junior Member
It takes a Mopar to Catch a Mopar
Posts: 224
|
Post by jim68cuda on Mar 14, 2008 6:15:39 GMT 1
 ...but Arnold's was short lived, and by the mid-60's, there was a gas station standing on the corner again. |
|
|
|
Post by Sylvain on Mar 14, 2008 10:09:46 GMT 1
Wow… Interesting conversions of CMW's Impala and Chrysler and Revell's Polara into convertibles! And I notice you've modified Busch/Praliné's Buick to ake a 2-door sedan.
May I ask what you have used as interior for the Polara? And have made other convertibles using coupes?
|
|
jim68cuda
Junior Member
It takes a Mopar to Catch a Mopar
Posts: 224
|
Post by jim68cuda on Mar 14, 2008 12:47:32 GMT 1
Thanks. The Busch Praline Buick was sort of a side job. I had cut and removed the B-pillar and side glass fro the same color Busch Praline 50 Cadillac to make it a hardtop rather than a post sedan. Since I had the same color B-pillars, and since theres already a mold line on the rear quarters of the Buick that almost looks like a door line, I just glued the Cadillac door posts imediately forward of the trailing edge of the front door seam, and painted on door handles, and scribed a vent window into the rear door windows. I don't remember if the Buick already had sid glass or if I had to use the side glass out of the Cadillac. I have a Buick hardtop with no side glass, but I may have cut that side glass out myself many years ago.
The CMW 61 Impals and 57 300 have just had their roofs removed with a dremel. The convertible boot on both is from the CMW 55 Bel Air convertible. The Tyco camaro convertible has the windshield and interior and boot, and chassis from a Busch Mustang.
The Revell 61 Dodge polara convertible retains its original windshield and windshield frame, with the roof having been cut off leaving the windshield frame. The interior and dash is from a Revell 61 Chrysler Newport convertible (parts car).
I cheat in using drivers for the convertibles and don't worry about having their hands on the steering wheels. I get packages of passengers for HO trains. They come in seated positions without legs, and most easilly fit in a car with little modification. I've never bought it myself, but I believe Merten made HO scale driver figures at one time. I don't believe they are still available though.
|
|
|
|
Post by Sylvain on Mar 14, 2008 22:05:11 GMT 1
Thanks. The Busch Praline Buick was sort of a side job. I had cut and removed the B-pillar and side glass fro the same color Busch Praline 50 Cadillac to make it a hardtop rather than a post sedan. Since I had the same color B-pillars, and since theres already a mold line on the rear quarters of the Buick that almost looks like a door line, I just glued the Cadillac door posts imediately forward of the trailing edge of the front door seam, and painted on door handles, and scribed a vent window into the rear door windows. I don't remember if the Buick already had sid glass or if I had to use the side glass out of the Cadillac. I have a Buick hardtop with no side glass, but I may have cut that side glass out myself many years ago. Thanks for your answer. I did make a very similar work on one of my Praliné/Busch 1950 Buicks too, years ago. In fact, the front door line and even the roof line were more adequate for a sedan than a coupe. And as you say, the mold line in the rear was just were the rear door line of a Riviera Sedan should be. I've never bought it myself, but I believe Merten made HO scale driver figures at one time. I don't believe they are still available though. I think Preiser is still doing some, but I've never bought it either. I don't put many drivers in my cars (in fact, the two only ones really glued in place are two policemen in a modified Verem 1950 Chevrolet), but I've done some, just Preiser seating figures with their legs cut and arms modified to reach the steering wheels. |
|
acd
Apprentice

Posts: 81
|
Post by acd on Mar 18, 2008 4:17:09 GMT 1
Great pictures Jim! Your buildings and scenery look good too. I recognize many of your buldings but is your Ford dealership your own creation or is it a kit? There's a building in a nearby town that housed a Cadillac-Pontiac dealership until a few years ago that looks just like it. How did you make the roads? Again, nice work!
|
|
jim68cuda
Junior Member
It takes a Mopar to Catch a Mopar
Posts: 224
|
Post by jim68cuda on Mar 18, 2008 4:58:21 GMT 1
The Ford dealership building is a resin kit. I built it mirror reversed from the plans and catalog photos. The manufacturer is Funaro & Camerlengo. I found it listed in the 2002 Walthers catalog as #279-9 Art Deco corner building. It doesn't show up in my 2007 Walthers catalog.
It is a cool building, and I had my local hooby shop order it for me because it really looked like the perfect vintage car dealership.
The streets and sidewalks are Walthers Street Systems. I painted concrete streets Model Masters Camoflage gray. The brick streets I painted flat black and quickly wiped pff the tops of the bricks before the paint dried, so that the paint remaind only in the mortor joints. That process also darkened and dulled the brick color considerably, so I didn't need to add a dull cote at all. Walthers also makes Asphalt strees in this series now.
For the narrow brick street I only used one side of the two part street system as I didn't want the side street to be as wide as the main street.
The white stripes forming the cross walks and double yellow lines on the pavement are self adhesive tape called EZ-Stripes by Scale Scenics, and are specifically made for marking 1/87 scale roadways. I found these in the scenery section of the Walthers catalog as well. In some areas, after applying the stripes, I sprayed Dullcote over top to prevent the ends from peeling up later.
|
|


 I especially like the Camero convertible, 40 Ford coupe, and the GTO. Nice work on the conversions.