|
|
Post by Sylvain on Mar 8, 2006 0:55:34 GMT 1
Thanks for the kind words. Except the american buildings, these models have been made years ago, and it was for doing them (and others before) that I've started to look at how buildings were made. So I became interested in architecture. But "That's another story…" ;D But I must say I find rather funny that today, almost twenty years later, I'm designing and overseeing the construction of models for museums of architecture. As Lee has asked for them, I will post some very soon. By the way, the "Magicien d'Oz" was a toy shop, of course.  Soon, I will post new pictures of cars in my gallery. At last, I've found the time to work on models again.  |
|
|
|
Post by Sylvain on Mar 9, 2006 23:09:27 GMT 1
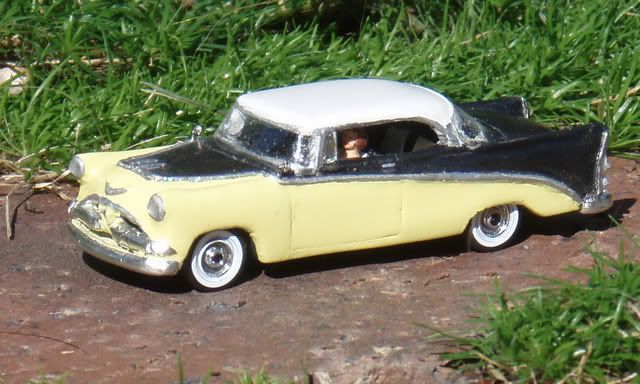
So here they are, a few more cars added to my gallery. For these new ones, I’ve been unfaithful to american cars (sorry Lee, Jerry, Joe and Stephen  ), and I’ve built some french car kits. Some months ago, I’ve told you that I’ve bought some SAI’s kits, especially some 203. I’ve finally found the time to build some of them, and I’ve decided, as I’ve heard bad things about this 203, that I could perhaps tell you a little more about them. You may remember that I’ve always told you that these white metals kits seem to be of good quality, and remind me of Alloy Forms kits for the quality of the engraving. Well, after having built some of them, I really still feel the same. And I can tell you know that these kits are really of good quality. Let’s start with the 203. I’ve bought 3 versions of it: the sedan, the station wagon and the convertible. I’m going to buy a pick-up too, but it’s still not available at my usual model shop. These 3 kits are very well thought and very well designed. Each set is composed of a white metal body, the chassis, various separated pieces of white metal depending of the model, a vacuum formed glazing in transparent plastic, some various photo-etched parts and a set of 4 wheels. The quality of the engraving of the 3 bodies is very good, and very sharp, but not too much, so it does not disappears with the painting. Some details are different depending on the version. The grille takes part of the body, but not the bumpers, which are separated parts. So it’s much easier to paint the model. Note that each model has specific bumpers, as on real cars and that so the station wagon has a different rear-bumper than the sedan and convertible. Only problem with these bodies: the front doors windows, which should have been in two parts, and the fact that there should have been some space between the grille and the front lights. Not much, I know, but important for the look of the car. Dimensions are really good, as if I’m not wrong, for the sedan, the real car dimensions should be in 1/87 scale 5 cm in length, 1,9 cm in width and 1,8 cm in high, when the model is 5 cm long, 1,7 cm wide and 1,8 cm high. The lines of the models look good and the proportions seem rather fine. The chassis is different for each car, and, depending on the model, it includes the dashboard (very simple for the sedan and station-wagon), and the front seat. Other seats are separated parts in white metal, to glue to the chassis, but all pieces are designed such a way that you can only glue them one way. The dashboard of the convertible is a separate part, so it’s easier to paint the few details represented (radio, etc…). A simple but accurate steering wheel is included with each set. Each kit includes vacuum formed glazing in transparent plastic, and… it fits to the model, which is too rare not to be mentioned. Each kit except the convertible, for which you have to cut what you need into the glazing of a sedan. For my part, I’ve preferred to make it with some transparent plastic I have at hand. Much easier that way. Each kit includes too a set of four wheels. For the sedan and the convertible, you get plastic wheels with rubber tires, the same use by MFM for the Peugeot kits. Personally, I don’t like them. They’re not accurate for 203s, and too small. So I’ve used very simple Eko’s large wheels, which I’ve tried to paint the best I could. On the contrary, the station wagon has very interesting wheels, composed of a black plastic base representing the tire, in which you have to glue two different photo-etched parts. It’s very easy to do, and very good-looking. I’ve seen that for ready-made models sold by SAI, the middle of such wheels is painted in chromed, but I don’t think it’s right as it represents a wheel without hubcap I think. Of course, it’s perfect for pick-ups and more and less for station wagons. To finish the model, you have to glue some photo-etched parts, two windscreen wipers and a rear view mirror. The windscreens wipers I’ve got with my station wagon are too small I think, but the ones with the sedan and convertible are fine. fr.pg.photos.yahoo.com/ph/archi187/detail?.dir=e044&.dnm=f933re2.jpgfr.pg.photos.yahoo.com/ph/archi187/detail?.dir=e044&.dnm=1dc2re2.jpg&.src=phfr.pg.photos.yahoo.com/ph/archi187/detail?.dir=e044&.dnm=d002re2.jpg&.src=phSo, really, these SAI’s 203 kits are really nice, and easy to build and paint. All I can do is to recommend them. Soon, I’ll tell you about the Ariane. More classic kit, but rather nice too. I’ve posted a picture of it already. fr.pg.photos.yahoo.com/ph/archi187/detail?.dir=e044&.dnm=2bdare2.jpg&.src=phAlso in this gallery a picture of Busch's 4cv with modified wheels (looks much better that way I think) and a modified Brekina's Traction-Avant. fr.pg.photos.yahoo.com/ph/archi187/detail?.dir=e044&.dnm=b65bre2.jpg&.src=phfr.pg.photos.yahoo.com/ph/archi187/detail?.dir=e044&.dnm=2829re2.jpg&.src=ph |
|
|
|
Post by cfesmire on Mar 10, 2006 0:35:00 GMT 1
All really nice Sylvain, your painting is again, the very best.
|
|
Lee
Senior Member
Posts: 1,899 
|
Post by Lee on Mar 10, 2006 4:23:23 GMT 1
I’ve been unfaithful to american cars (sorry Lee, Jerry, Joe and Stephen ). No need at all to be sorry Sylvain. All of us enjoy watching a true master craftsman at work, no matter what the piece is that he is working on. Thank you for sharing the photos of your latest masterpieces with us. Also thank you for the great reviews of each of the models. Great work, my friend. |
|
|
|
Post by Sylvain on May 28, 2006 21:53:17 GMT 1
|
|
|
|
Post by cfesmire on May 29, 2006 13:05:37 GMT 1
Some great additions to the scale and as we have come to expect, an excellent job of finishing. Your painting abilities never cease to impress me Sylvain.
|
|
|
|
Post by DavidJohnson on May 30, 2006 2:04:39 GMT 1
Sylvain, it is nice to see finished models from you again. I think these are the first photos of CMC 53 Kaisers posted to the site. Nice work on making two very different versions of the car.
The CMC 1954 Manhattan has a very finely molded front end.
Dave
|
|
|
|
Post by Sylvain on May 30, 2006 10:41:17 GMT 1
Thanks!
In fact, the two different versions are proposed by Jerry and Lee, as they proposed a Manhattan (ref CMC 010) and a Dragon (ref CMC 012), each model with slightly different roof details. I've just taken advantage of these details.
I've tried once again to base my colors on the real shades proposed by Kaiser, but I think the roof of the Dragon is too dark.
|
|
|
|
Post by Sylvain on Jun 10, 2006 16:05:29 GMT 1
|
|
|
|
Post by nickvoges on Jun 10, 2006 21:04:03 GMT 1
Sylvain again you made a very, very good work. Have you some month of holidays to present us such a lot of models? All have the very caracteristic colours of there times.
There is one thing I don´t like, but even don´t know how to do it better: the black windows. I have seen once someone paint them lightblue with white shadows or lines, not too bad but even not the solution. Don´t know if there is a clear resin, so you wouldn´t have to paint the windows.
Someone knows how to get the Packards?
Best regards nick ingmar
|
|
Lee
Senior Member
Posts: 1,899
|
Post by Lee on Jun 10, 2006 22:10:18 GMT 1
I have cast in clear resin in the past. It is a real pain and doesn't really look all that great when painted up. There is a thread on painting windows in the workbench.
As usual, Sylvain has done some more fantastic finished pieces. It's almost worth making the pieces just to see Sylvain finish them. ;D
|
|
|
|
Post by Sylvain on Jun 10, 2006 23:29:37 GMT 1
Thanks Nick, Thanks Lee! Yes, Nick, as Lee says, there is a thread about paintnig windows. You may find there a solution that will please you better. I remember there were interesting solutions proposed. For my part, I think gloss black paint is the easiest and not so bad. And no, I've not much holidays now, just a lot of shame to be so late in building all the kits I've to build.  About the very interesting Packard, I know that Stephen sells them from time to time on eBay; together with some other interesting models (1948 Studebaker Sedan, business coupe and convertible, 1949 DeSoto Taxi, 1955 Cadillac Ambulance). His name on eBay is b52-h. I've 4 other of his models on work now, I hope to have finished them in a week or two, together with some other CMC. Then, I will go on with Joe's models…  and the new CMC's… |
|
Jerry
Junior Member
Posts: 139
|
Post by Jerry on Jun 11, 2006 0:25:46 GMT 1
Nick
Nick,
Often I will paint the windows black and I think they look great, however, if you wish something a bit more realistic, try this paint scheme. I first paint the windows "navy gloss gray, by Model Master. It is water clean- up. After it has thoroughly dried, I will spray a little gloss pearl clearcoat into a little paint dish and apply it to the windows. The gloss pearl will give the windows a "sun glare" look. The gloss pearl is also by Model Master#2944. This is enamel and comes in a spray can. I wish it came in a bottle, but I am told it comes only in the can.
Jerry
|
|
|
|
Post by DavidJohnson on Jun 11, 2006 5:14:31 GMT 1
Sylvain,
I always enjoy seeing your painting of models not seen before on this forum. Nice work.
Dave
|
|
|
|
Post by Sylvain on Nov 1, 2006 22:50:05 GMT 1
|
|


 ), and I’ve built some french car kits.

 and the new CMC's…