|
|
Post by stevette66 on Apr 12, 2011 1:55:49 GMT 1
Chester those are reat! Nice job as usual.
Just love your stuff! Sylvan makes some really nice kits
Steve D
|
|
|
|
Post by cfesmire on Apr 12, 2011 2:14:02 GMT 1
Thanks Steve, and careful not to get a sunburn down in Fla. An update on the Ford Model T ambulance. Found some 1/76 scale red crosses from Hinchcliffe Models. They're German red crosses. What's the difference? The American red cross was on a square white background and the German on a round background. An improvement over my hand painted one's anyway.  |
|
|
|
Post by cfesmire on Apr 25, 2011 16:39:13 GMT 1
Here's another of the Roco Zis-'s in a cement mixer. The mixer unit is from the Rio Grande Shraeder mixer kit that is a crawler unit cut down fit to the truck. I built one of these before but made some additions and changes to the way I did the first one.   |
|
|
|
Post by Cor_DutchArt on Apr 26, 2011 9:07:55 GMT 1
I wonder whether the gravity of the loaded mixer does not fall behind the rear axle.
Even then it is a masterpiece again.
|
|
|
|
Post by cfesmire on Apr 27, 2011 15:47:20 GMT 1
Cor, It was a bit rear end heavy but that had more to do with the fact that all the mixer unit is cast metal and the truck is just plastic. I weighted the front by adding lead under the hood. The center of gravity for the entire mixer unit is still over the rear wheels. OK it's T time again. No not Red Zinger or Sleepy Time but a pair of Jordan Model T's. This first one is a Model TT that is chopped up by removing the doors and hood, put a radiator support in and extended the steering column. The emergency brake cable was added and I used the stake bed and exposed the little flat head engine that came with the kit.  The next is what Jordan calls the postal truck. I didn't use the screened in rear but added the scuff boards to the back end and diagonal supports at the rear and a running board tool box.  |
|
|
|
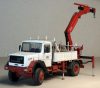
Post by Cor_DutchArt on Apr 27, 2011 16:43:41 GMT 1
Beautiful stuff from Rio Grande too.
I planned a mobile crane on a Woodland Scenics Diamond T..
I hope to find some time in the near future..
Jordan still is a class on his own..
Even then you can upgrade them..
|
|
Barnaba
Junior Member
Magirus-Deutz 160 D 15 AK Enel
Posts: 128
|
Post by Barnaba on Apr 29, 2011 23:27:25 GMT 1
Chester, your models remain a reference for 1/87 weathering and realism!!!  I've seen your Mack at 1-87vehicles website and it looks great too. What about the scrapes on the dump body? Look very realistic! Which technique do you use? 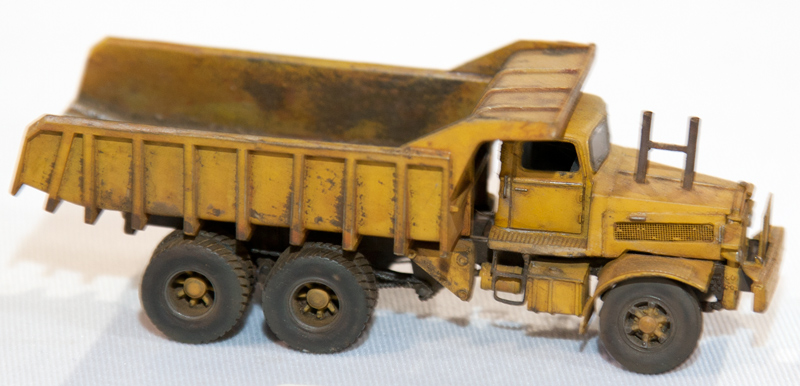 |
|
|
|
Post by cfesmire on Apr 30, 2011 12:59:20 GMT 1
Het Barnaba good to hear from you. Been a while. The chips and peeled paints is done by painting the model in a dark brown base coat (acrylic). Then I air brush a very thin coat of Future floor finish, when dry apply my finish coat of paint (solvent based). I then wet the model with Windex (blue glass cleaner) take a toothpick and chew the end a bit to soften it and pick away at the model to create the chipping. Washes and chalks follow. Some larger scale modelers use water based hair spray instead of Future and chip with just water. This is a little better picture of the results on the Mack.  Here's the newest in another of the Jordan kits, the Ford Model AA. The bed and tow unit are scratch built.   |
|
Barnaba
Junior Member
Magirus-Deutz 160 D 15 AK Enel
Posts: 128
|
Post by Barnaba on Apr 30, 2011 22:02:28 GMT 1
Hi Chester, pls forgive me if I ask some clarifications.
Let me try to report the main steps:
1. airbrush the dark brown acrylic
2. airbrush the Future floor finish: is it a sort of soap for cleaning floors? Do you spray it immediately after the acrylic before it dryes? Is it used to avoid the acrylic to dry properly?
3.finish coat (solvent based).
4. wet the model with glass cleaner and some dark brown can be removed using a toothpick.
Thanks in advance for the clarification and pls forgive me for the bad english.
|
|
|
|
Post by cfesmire on May 1, 2011 0:39:55 GMT 1
OK let's see, for a full run down on Future floor finish see here: www.swannysmodels.com/TheCompleteFuture.htmlSuffice it to say it is a clear acrylic finish that leaves a high gloss. I use it to replicate puddles and things on dioramas I want to look wet too. As far as the acrylic paint goes, it is dry when the Future (or hairspray) is sprayed. Be very conservative with the clear finish no need for complete coverage even. I use the air brush for it. Finish coat I use is Floquil rail colors because they dry flat but any thinner (turpentine) based paint will do. When it is dry but not completely cured (within an hour or two) wet the model with the Windex. I found the blue windshield washer fluid works also. Now you're removing the top coat of paint (the yellow not the brown in this instance) with the toothpick. Allow the blue stuff to remove the top coat with gentle persuasion and not aggressive scrubbing. Give it a try on something not particularly important before using the technique on a model you've spent a lot of time on. Experiment and have fun! |
|
|
|
Post by DavidJohnson on May 1, 2011 14:20:32 GMT 1
Chester,
I really like your vintage trucks, and especially the tow truck
Dave
|
|
Barnaba
Junior Member
Magirus-Deutz 160 D 15 AK Enel
Posts: 128
|
Post by Barnaba on May 1, 2011 20:29:19 GMT 1
Hi Chester, maybe now I have understood ;D. The "finish coat of paint" in your expanation was the final colour of the vehicle (yellor in the truck above), while I thought it was a clear finish. This was the misunderstanding.  Thanks for the additional explanation. |
|
perez
Junior Member
Posts: 113
|
Post by perez on May 2, 2011 20:05:28 GMT 1
Likw always Chester, u never fail to amaze me. That yellow Mack dump truck.....is it in 1/87 scale?? I'm asking because I always wanted the front wheels for a old school look for my mack trucks. Where did u got them??? If it is bigger than 1/87 scale, then, my goose is cooked.
|
|
|
|
Post by cfesmire on May 7, 2011 19:02:40 GMT 1
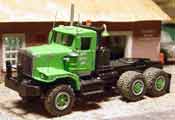
Perez, everything I show is 1/87 scale. The model is the Don Mills FCSW but I don't think the tires can be bought separately. This next truck is the Mack BM from Alloy Forms. There are several glaring problems with this cast metal kit aside from some fairly poor castings. The roof of the kit is flat but on the prototype it is slightly rounded and the roof front radius goes into the visor which has small radii on the outside corners too. I tried to fix all of that with JB Weld. The next and most annoying problem is that in the kit, the radiator sits behind the front edge of the fenders. Easy enough fix simply by moving the whole cab out in front of the fenders. The awful metal discs they supply for headlights have been replaced too. The van body is scratch built from styrene. My disgraceful decal work will be redone I hope.   |
|
|
|
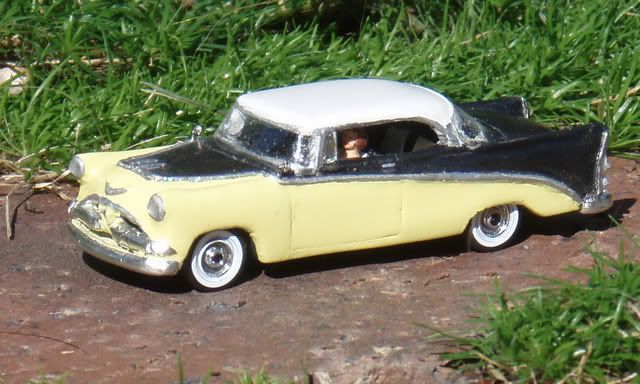
Post by cfesmire on May 10, 2011 3:10:55 GMT 1
I suppose this one needs some explaining. On another large scale model forum they're having a virtual stock car race with 1/87 scale cars. This is my entry. The '57 Monogram Chevy.   |
|