skunk
87thScale addict
5th B-day
Posts: 2,762
|
Post by skunk on Sept 8, 2006 6:48:12 GMT 1
Sadly no camera, but here's what's currently going on: Hollowed out a Saab Sonett II, but the project is currently on hiatus until I get more modelling gear. The next step is to fashion an interior, prototype shots have already been assembled. Since I won't be getting my airbrush back anytime too soon, I thought I would have to leave modelling alone until then. Then I realized that a motorcycle is way too small to be airbrushed anyhow, so here's my newest project: 1998 Ducati Monster 900 i.e. So far I have built the rear tire, rim, and brake disc. I am currently working on the thread pattern. This bike might take me a while.  Again, I don't currently have a camera, and I doubt that I would be able to take any pictures of parts that small anyhow.  |
|
|
|
Post by cfesmire on Sept 8, 2006 12:05:31 GMT 1
Geez, no camera, no airbrush, how are you fixed for socks and underwear?
|
|
skunk
87thScale addict
5th B-day
Posts: 2,762
|
Post by skunk on Sept 8, 2006 16:24:00 GMT 1
I own several pairs of socks. Underwear, though, is just so petit-bourgeouis.
|
|
skunk
87thScale addict
5th B-day
Posts: 2,762
|
Post by skunk on Nov 21, 2006 6:26:15 GMT 1
Here is a picture of the above mentioned Saab Sonett II:  As you can see, I just got a new camera today - this shot was taken at 11pm with only lamplight and no flash! I can actually control the camera (Canon Rebel XT) directly from my computer, which is pretty cool. This little motorcycle is just something I have been messing around with on the side:  It's a Preiser moped modified to look more like a 70's Zündapp KS. I don't know how to go about getting some black stickers with silver "Zündapp" lettering on them (for the tank). Obviously there is a bit of work left to be done. |
|
|
|
Post by cfesmire on Nov 21, 2006 23:59:03 GMT 1
Awesome on both pieces Håkan. Looks like you did a lot of flash removal on the bike.
|
|
|
|
Post by superba on Nov 28, 2006 2:14:26 GMT 1
The Sonet looks great, can't wait to see the finished product
|
|
skunk
87thScale addict
5th B-day
Posts: 2,762
|
Post by skunk on Dec 30, 2006 3:17:59 GMT 1
A bit of progress over the last couple of weeks.    This is the chassis taking shape. In the first shot, the chassis is pointing backwards. Then the wheels (from a Brekina VW bus) are mounted, it rolls nicely, but it was a lot of trouble to get all four wheels evenly on the ground.    Standing on it's own four legs! In the middle shot you can see that I have removed the VW logos from two of the wheels with my trusty scalpel. The tiny pieces of clear plastic are the rear inner fenders, they are painted white and mounted in the third shot. In the third shot the front bulkhead is also mounted.    And on it goes. I constantly check the fit of the chassis to the body. In the middle shot I have also finished sculpting the rear bulkhead. In the third shot is the dashboard in the raw.  The dash is nearly finished. The radio still needs a bit of work, and some other details need doing. On the left is a demo of how I fashion push-buttons for the dash. I just drill a small hole (#92, 0.20 mm) and dip the tip of a wire of the same thickness into paint. Then I file down the tip of the wire after I insert it into the hole. Once it's mounted, I paint it again. Also, the handle on the ashtray (the little silver blob) is a 1mm length of my girlfriend's hair.  For the gauges, I paint them onto the tips of evergreen rods. Then I drill holes of the same size, insert the rods, and voila! This way, the gauges can also be mounted as deeply as I want them. I imagine this technique would also work with decals. |
|
skunk
87thScale addict
5th B-day
Posts: 2,762
|
Post by skunk on Jan 5, 2007 8:24:56 GMT 1
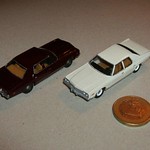
Bought all kinds of casting materials today. My first attempt was a simple copy of a Bburago Bugatti EB110, and it turned out ten times better than I had ever expected.
I was slightly impatient and cast without making a properly shaped insert to hollowcast, but it should be a nice model once I worked it a bit.
I do not have a vacuum pump, but using a decent electronic scale with which to measure parts A and B may be a more important investment. Air bubbles are negligible, six or seven miniscule indentations along the wide flanks of the Bug. I feel a bit like a new father...
Tomorrow I will try to shrink something, probably a Tomica Corolla.
|
|
|
|
Post by superba on Jan 5, 2007 17:50:24 GMT 1
Welcome to the wonderful world of casting! Prepared to get addicted.
|
|
|
|
Post by jackfitz1944 on Jan 5, 2007 18:56:28 GMT 1
I have been making molds and casting parts for quite some time. I have naver used a vacuum pump. I do have a very nice scale. It makes measureing a 10 to 1 and 1 to 1 mix a lot more reliable. Never had a bad mold, but castings are another matter. Most of my problems were my fault for being in a hurry or not following the best method.
|
|
skunk
87thScale addict
5th B-day
Posts: 2,762
|
Post by skunk on Jan 12, 2007 17:49:09 GMT 1
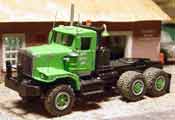
Just made my first Hydroshrink casting! A Tomica Toyota Corolla FF 4dr sedan (circa 1984?), as already promised. I used very chilled, distilled water as advised by various others. The sculpting came out good, with only two small bubbles for now. Hopefully more won't appear, I don't really know how the stuff behaves as it shrinks. It shrunk 3mm overnight, and is turning quite banana-shaped already. Here's a pic of it as it came from the mold:  I used 32g hydroshrink and 62.5g H 2O. I did not cast the bumpers as I prefer to make them myself later. The steering wheel is already perfect size for 1/87, saves me some work! |
|
|
|
Post by only87 on Jan 12, 2007 19:55:53 GMT 1
I would put some toothpicks or something similar under the casting so it gets air from the underside and doesn't stick to the ground.
If you have a lamp, light, bulb etc. and maybe a metal grid, solid lamp shade or something similar you can build a simple heater. That should shorten the shrinking time down to a few days.
I used a lamp with a flat, closed plastic top where I put my castings. The top was maybe 3 or 4 inches away from the bulb, when letting the light on for a few hours the top got to a rather warm temperature. When I put the castings there, some toothpicks between and turned the casting from time to time it took only between 24 to 48 hours to get the casting down to the correct size.
|
|
|
|
Post by superba on Jan 13, 2007 1:10:43 GMT 1
I have been placing the Hydroshrink castings on RTV molds so they don't stick to anything. The Hydroshrink rubber will stick and can damage objects. I have a stain on my office desk, from placing a Hydroshrink casting on top for just a minute.
Hydroshrink castings also shrink well when place on glass.
Don't be disturbed by major warpage in the first couple of days.
good luck.
|
|
|
|
Post by jackfitz1944 on Jan 13, 2007 21:03:11 GMT 1
When I pour a mold or casting, I place it on top of my de-humidifier to get the air bubbles out. The vibration of the machine brings the bubbles to the top. I let it sit there until it has cured. I also use a talcum powder bag to eliminate the static electricity inside the mold before pouring the resin.
|
|
MSteele
Junior Member
On Youtube now!
Posts: 241
|
Post by MSteele on Jan 13, 2007 22:27:07 GMT 1
Just made my first Hydroshrink casting! A Tomica Toyota Corolla FF 4dr sedan (circa 1984?) ^^ Oh yeah^^^ Cannot wait and see how this one turns out. |
|


 For the gauges, I paint them onto the tips of evergreen rods. Then I drill holes of the same size, insert the rods, and voila! This way, the gauges can also be mounted as deeply as I want them. I imagine this technique would also work with decals.