|
|
Post by DavidJohnson on Mar 10, 2005 1:50:51 GMT 1
There are currently some good discussions going on hollowing out solid cast resin bodies, and on various ways to form Clear Plastic Windows. I'll give a quick summary of where those posts are, and what they contain. I'm sure to miss some, so others can add. This thread will serve us for future discussion on topic.
In the Workbench Thread "What Color For Windows",
Skunk has several posts on page 1 regarding hollowing resin bodies, and heating clear plastic over a form, using a hair dryer.
On page 2 Skunk posted a link to an excellent tutorial on how to hollow out a solid cast resin kit.
In the General Message Board thread "Joes Castings there are numerous posts on pages 7 and 8.
Sylvain says that he uses Rhodoid, a clear plastic film cut to shape and glued to the outside. That tradename is available primarily in France. DavidJohnson identified the material as cellulose acetate film, used in graphic arts, and possibly available under other trade names. Sometimes it is known simply as acetate.
Superba has used Elmers clear school glue.
Meguntic suggests Clear 0.005" styrene from Evergreen
( this is a material that should heat form)
Skunk reveals his source of heat formable films as carryout food packaging. Also more on what to use as glue.
********************************************
I will add another potential method, written about by Ken Patterson in one of the model railroading publications. He has used clear box sealing tape (the clear to the core varieties) and claimed longevity running 2+ years.
When my Superba models are ready for glazing (will be awhile as time is scarce) I will try some of these methods and write about what worked for me.
Dave
|
|
|
|
Post by Sylvain on Mar 10, 2005 12:45:30 GMT 1
Thanks Dave, for this summary. Good idea!  |
|
|
|
Post by cfesmire on Mar 10, 2005 13:39:16 GMT 1
Yes Dave thanks for organizing this subject for us. Now will you go through the entire site subject by subject for us?  On the subject of windows, somewhere I have mentioned the film that is used to tint windows in 1/1 vehicles. I'm sure you are all familiar with the effects seen on cars with tinted or mirrored glass. This film is relatively inexpensive and is very easy to work with. I did a Herpa Setra bus in it with nice results. Sorry the rest of the model is too poorly done to display, but perhaps I will post a pic somewhere to show the windows. |
|
skunk
87thScale addict
5th B-day
Posts: 2,762
|
Post by skunk on Mar 10, 2005 23:58:36 GMT 1
Yes Dave thanks for organizing this subject for us. Now will you go through the entire site subject by subject for us? On the subject of windows, somewhere I have mentioned the film that is used to tint windows in 1/1 vehicles. I'm sure you are all familiar with the effects seen on cars with tinted or mirrored glass. This film is relatively inexpensive and is very easy to work with. I did a Herpa Setra bus in it with nice results. Sorry the rest of the model is too poorly done to display, but perhaps I will post a pic somewhere to show the windows. Chester kindly mailed me a chunk of this tint material, which I used to good effect on the rear windows of a VW T3 Pickup that can be seen under my name in the Showcase section of this site (under my real name, Håkan Westergren). I have yet to use this material on curved windows, however. |
|
|
|
Post by cfesmire on Mar 11, 2005 1:55:58 GMT 1
Håkan,
Leave it to me to not be able to put 2+2 together, I don't know how often I've seen your name in the showcase and not looked. Well now I have and I must say that Nova looks great. Those wheels are outstanding. I have considered hollowing out a solid resin but am in such a rush to see the finished product that I take a pass. The glass looks good in the VW, I'm sitting on so much of that stuff, I really should use it. So many "shoulda" and "coulda" going on in my life (especially the Krispy Kreme stocks a few months ago)
|
|
|
|
Post by DavidJohnson on Mar 11, 2005 3:33:15 GMT 1
Håkan,
Nice models! I never quite made the connection either.
I never imagined the Magunson Nova could look so great. I remember the prototype well and you really captured the look, including a color which in your photo looks like a jazzed version of late 70's GM colors. I hope you customized the engine to match, as most had a 6 cylinder and strained to exceed the national speed limit of 55 mph.
Dave
|
|
|
|
Post by only87 on Apr 13, 2005 1:03:40 GMT 1
Glazing makes me do a lot of thinking at the moment. I have various vehicles that still need their windows "stuffed".
Now, I came to this idea: Might it be possible to cast an existing glazing piece by using Krystal Clear as a surrogate for resin?
I did not use Krystal Clear so far, and so I don't know if it is at least wort a try. What do you guys think?
|
|
skunk
87thScale addict
5th B-day
Posts: 2,762
|
Post by skunk on Apr 13, 2005 1:32:49 GMT 1
Glazing makes me do a lot of thinking at the moment. I have various vehicles that still need their windows "stuffed". Now, I came to this idea: Might it be possible to cast an existing glazing piece by using Krystal Clear as a surrogate for resin? I did not use Krystal Clear so far, and so I don't know if it is at least wort a try. What do you guys think? I use Krystal Kleer (or however it is they spel itt) as glue, so that should give you some indication as to its usefulness for casting. You are going to have to relent, and buy a hairdryer. |
|
Lee
Senior Member
Posts: 1,899 
|
Post by Lee on Apr 17, 2005 22:29:52 GMT 1
It just may be possible to make windows for any hollow cast body. This is something that I haven't tried ------ yet. Fill the hollow body with clay letting it oose out the windows. Shape the clay on the outside to the correct windows that you wish and smooth with a little water. Carefully remove the clay from the body trying to retain the shape. Take a vacumm cleaner attachment, one of the kind with a wide mouth, to use as a vacumm "box". Fasten some small metal angles around the outside of the mouth (something to clamp to) Plug the attachment about 1 1/2 inches below the the mouth opening with paper, clay, etc. Pour wet plaster into the mouth of the opening and insert the clay shape making sure all the windows are covered with the plaster. Set aside and let the plaster dry. Remove the clay, the female plaster cast and the plug from the vacumm attachment. With a number 80 drill, drill small holes in the corners of the windows in the female plaster mold. The holes must go all the way through the paster mold as this is where the vacumm will be pulling on the plastic. It doesn't matter if the plaster chips away on the back side of the mold. Put the plaster mold back into the vacumm attachment and clamp a piece of clear plastic over the mouth. Attach the vacumm attachment to the vacumm hose. Heat the plastic with a heat gun or hair dryer. When you see the plastic soften, turn on the vacumm cleaner to suck the plastic down into the plaster mold. Let the plastic cool before removing from the plaster mold. You should have a set of windows that will be a snug/snap fit in the body of the model. The plaster mold would be reusable for the same type/size of body and the vacumm attachment could be used for any number of molds. Anyone see any flaw(s) in my thinking? Let us know if you get around to trying it before me.  |
|
skunk
87thScale addict
5th B-day
Posts: 2,762
|
Post by skunk on Apr 18, 2005 0:27:25 GMT 1
Sounds like a good theory. And if the facts dont fit the theory, change the facts. |
|
|
|
Post by only87 on Apr 24, 2005 4:03:26 GMT 1
I did a little testing now on my Kristal Klear idea. So far, it seems to work. The only big problem is the crystalizing (or drying) time it needs. I takes ages... Maybe heating it could hurry it a little.
I casted a truck front wheel (which is about 3 mm thick) with this stuff and except for some air bubbles it turned out fine. Ok, you have a very high shrinking factor but that shouldn't matter for windows since the material sticks to the mold and keeps the basic structure of the casted piece perfectly. It just turns out thinner than the original coat film, but it could create a lense effect on the edges depending on the thickness of the glazing.
I'm now thinking of doing a single female mold and coat it on the inside. After some days of drying time I should have a very thin and flexible glazing. At least, that's the thinking, still needs a try.
|
|
|
|
Post by DavidJohnson on Jul 11, 2005 23:02:33 GMT 1
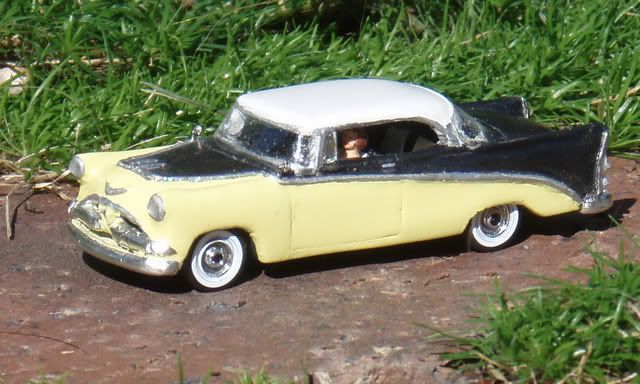
At last I have found some modeling time and have completed one of Joe's castings. The model was a hands on experience in glazing, using many of the methods described by other forum members, with four different methods used on this model. pg.photos.yahoo.com/ph/autorail87/detail?.dir=8203&.dnm=7c49.jpgpg.photos.yahoo.com/ph/autorail87/detail?.dir=8203&.dnm=8e66.jpgHere are my experineces with glazing techinques as promised in the intro to this thread. For the rear glass I used the heat forming method described by Hakan (aka. Skunk). A buck was sanded to shape from styrene strip, then glued to a block of wood. First I tried heating 0.005" Evergreen clear styrene over the form, but found I could not control it. Next I used some clear blister packaging and found it extremely easy to heat form. Cutting to shape was a little trickier. A narrow strip of masking tape was applied over the window opening on the model and a pencil used to create an outline. Then the tape was stuck on the formed plastic and the small scissors was from my Swiss Army knife was used to trim it to shape. Kristal Klear was used to adhere it and fill gaps at the edges. The buck was formed by eye and it a little too thick to fit into the opening. Slight oversize is good because the heat formed plastic tends to wrap the edges of the buck. My buck was made for the windshield, but worked just as well for the rear glass. My first attempt at the windshield was with a clear to the core box sealing tape. For the curvature of this windshield this tape was too stiff and I had trouble gettining it to stick. However, it did stick well enough to the roof to strip a large piece of paint. Chalk up one for learning. Second attempt at the windshield was with 0.002" (50 micrometer) polyester film (sometimes referred to by a tradename, Mylar). The masking tape was used as above to cut the window shape from the film, then I uses Kristal Clear to glue the windshield to the car. I think this is similar to Sylvain's method, but with a different film material. Well, the film was too stiff for the curvature so I just glued the center section and (should have ) waited for it to dry. I believe this method would have worked had I been patient. Sucess came with 3M Scotch 600 tape, which is very thin, flexible, and clear. The adhesive is softer and there were no issues with paint damage. Tape was applied directly to the model then cut with a Xacto knife. Any small gaps were filled with Krystal Clear. When it was dry the inside (sticky side) was painted with Testors Acryl clear gloss to render it non-sticky. Previously I had experimented with both adhesive tapes and found this to work. Here is a link to the 3M web page. products3.3m.com/catalog/us/en001/home_leisure/-/node_GSTLSMBDW3be/root_GST1T4S9TCgv/vroot_GSHCV1ZFXKge/gvel_3DXK58039Cgl/theme_us_homeleisure_3_0/command_AbcPageHandler/output_htmlSide windows are the polyester film layed onto a thin bead of Kristal Klear. The open windows were an after thought and made the job easier. The vent panes are Krystal Klear, but if I were starting over I would have modeled them with film in cranked open position. Kristal Klear has merits too. It is easy, and it is durable. The difference in appearance between Krystal Clear and thin plastic film is , in my opinion, highly visible in photos but less noteable in person. My Alloy Forms models are 18 years old and there has been no problem with the glazing, even with an errant thumb pressed into the windshield of the MB Pontiac. In addition to the directions on the bottle, I added some extra Krystal Klear to the center of the window (right away when wet) to form a more uniform thickness. The model was stood on end and a bit upside down to let gravity help form the desired curvature. When all dry both sides were sealed with Testors Glosscote (clear solvent lacquer). The '55 Belair has the best photo, but the '57 Belair has the better glazing - the haze apparent in the photo is NOT there in person. The Matchbox 1960 Pontiac also has Kristal Clear windows and the windshield curvature was assisted with gentle air stream from an airbrush until the film had skinned and taken a set. pg.photos.yahoo.com/ph/autorail87/detail?.dir=8203&.dnm=8f7a.jpgpg.photos.yahoo.com/ph/autorail87/detail?.dir=8203&.dnm=442d.jpgI like the Scotch 600 tape or the film as applied by Sylvain to his models for clear thin smooth appearance. I will probably use all methods in the future with the choice depending on the model. Dave |
|
|
|
Post by cfesmire on Jul 12, 2005 0:59:34 GMT 1
|
|
|
|
Post by Sylvain on Jul 13, 2005 23:24:47 GMT 1
Dave,
Interesting, all your different tests of how to do glazing. And the results you show are very nice. As you suppose, what you've tried in your second attempt is very similar to what I do. For my part, I did not like to use adhesive tapes because of their sticky sides, but I've never thought of painting it with clear gloss. Thanks for the tip!
|
|
|
|
Post by DavidJohnson on Jul 14, 2005 2:31:58 GMT 1
Dave, Interesting, all your different tests of how to do glazing. And the results you show are very nice. As you suppose, what you've tried in your second attempt is very similar to what I do. For my part, I did not like to use adhesive tapes because of their sticky sides, but I've never thought of painting it with clear gloss. Thanks for the tip! Sylvain, It was your model photos which prompted me to find better glazing methods. The idea of painting over the sticky side of the tape was tested away from models to see what would work. For me the water based acrylic worked well, and a solvent based lacquerleft the tape still sticky. To test (some what) for long term stabiliy I put the tape into the kithchen oven at the lowest temperature setting for a couple hours, and it remained tack free. This goes with my profession as a lab chemist working with sticky tapes. Dave |
|